UPDATE 2021: The recommended approach for embedding Tableau visualizations in Salesforce Lighting Experience is to use the Tableau Viz Lightning Web Component.
This post is part of a series that is exploring the capabilities and limitations of various data visualization tools when embedded in Salesforce.
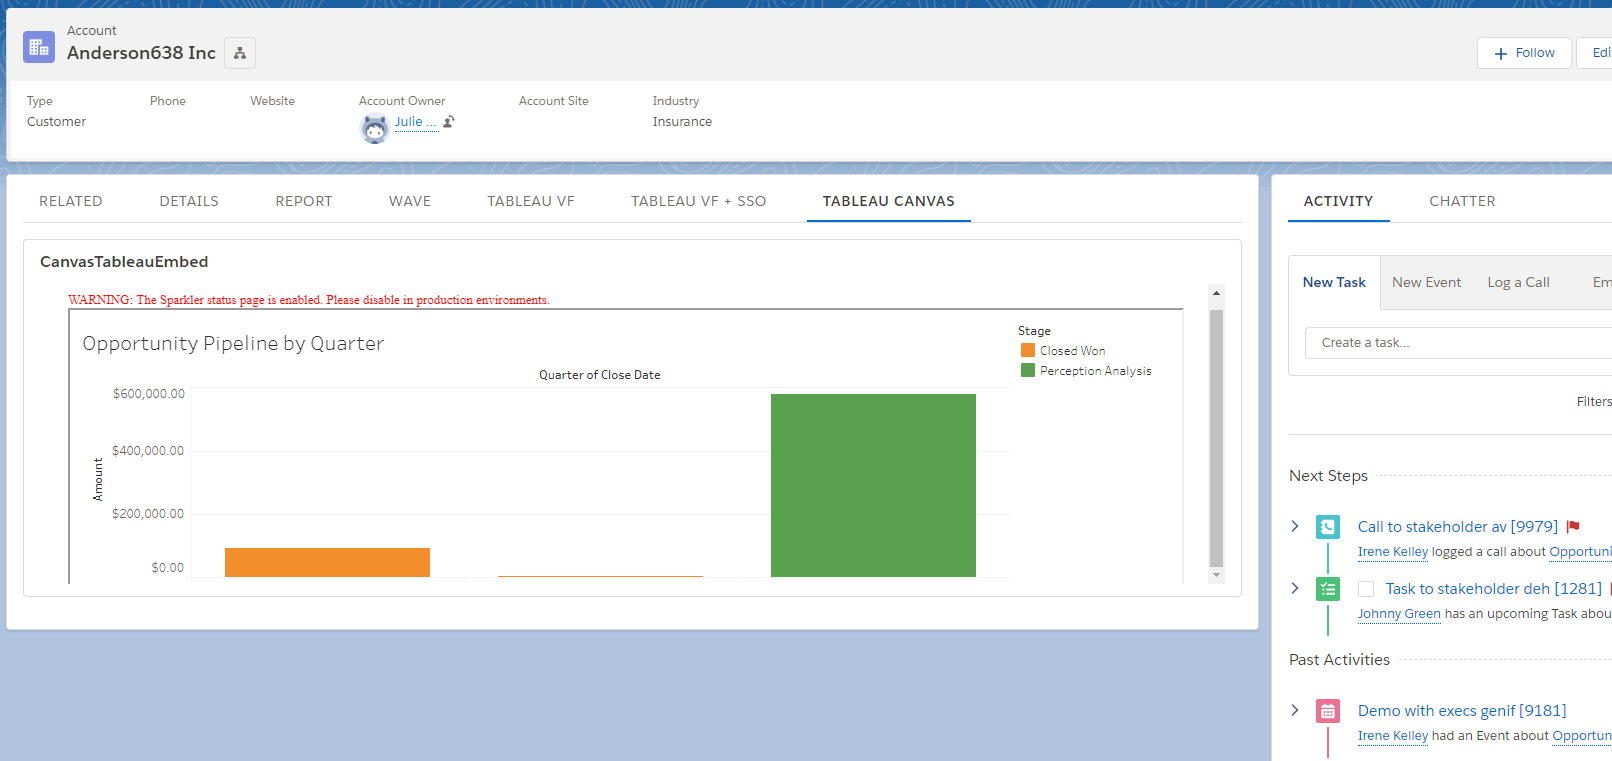
This is an example of how to use Salesforce Canvas to display and filter a Tableau dashboard on record pages in Lightning Experience.
Prerequisites
- Tableau Desktop: you will need Tableau Desktop. You cannot use Tableau Public for this example.
- Access to Tableau Online or Tableau Server: you will need an environment where you can publish and host the Tableau dashboard online. You will need system administrator access in order to configure authentication settings.
- Salesforce org populated with data you want to visualize; the example below uses data from the account and opportunity objects. You can create a free developer edition org that is pre-populated with data using this link.
Step 1: Create Dashboard in Tableau Desktop
Complete step 1 from the previous post
Step 2: Publish the Dashboard Online
Complete step 2 from the previous post
Step 3: Setup up Salesforce Canvas Adapter for Tableau (aka “Sparkler”)
Tableau built and provides limited support for a Java-based application called “Sparkler” that can be used to embed Tableau dashboards in Salesforce using Salesforce’s canvas framework. The steps below are for setting Sparkler version 1.04. Sparkler can be installed on the server of your choice, but the instructions provided by Tableau are written using Amazon EC2, so that’s the hosting solution we use here.
Download the adapter and supporting files
Download the adapter zip file from Tableau: https://www.tableau.com/sfdc-canvas-adapter
Unzip the file and open the PDF setup guide titled something similar to SalesforceCanvasAdapterforTableau(Sparkler)_v1-04.
Create AWS EC2 Instance
Create or sign into your AWS account. If you haven’t already set up an Identity and Access Management (IAM) user, create one using these instructions.
Log into AWS using the custom login URL and the IAM credentials. Complete Steps 2 and 3 in this tutorial: https://aws.amazon.com/ec2/getting-started/ to create and launch your EC2 instance.
You need to connect to the EC2 instance in order to install and configure the software required to run the sparkler app. I’m using a PC and the easiest way to connect is by using PuTTY. Note the step in where you need to allow inbound traffic. You should add an SSH rule for your IP address to the security group. While you have the security group open, add the following rules as well:
- Type: Custom TCP Rule; Protocol: TCP; Port Range: 8080; Source: Anywhere (used to test Tomcat installation later)
- Type: Custom TCP Rule; Protocol: TCP; Port Range: 80; Source Anywhere (allows inbound HTTP traffic)
- Type: Custom TCP Rule; Protocol: TCP; Port Range: 443; Source Anywhere (allows inbound HTTPS traffic)
- Type: Custom TCP Rule; Protocol: TCP; Port Range: 8443; Source Anywhere (used to test Tomcat HTTPS settings)
If this were a real world example you would probably want to restrict the accessible ports and the source IP addresses more than in this example.
Install Java 8
At this point, we are ready to work through the tasks in the Sparkler setup guide. The first task on page 10 is to install Java 8 and the steps for installing and verifying the installation are in the guide. I created an EC2 instance that has Java 7 pre-installed, so I had to uninstall Java 7 and install Java 8 using the following commands:
sudo yum install java-1.8.0
sudo yum remove java-1.7.0-openjdk
Make sure you verify that Java 8 is installed correctly.
Install Tomcat
Follow the instructions on pages 11-12 and make sure to successfully test the installation by accessing the server on port 8080 as illustrated on page 12.
Enable HTTPS for Tomcat
Follow the instructions on pages 13-16. Make sure that you are able to access the Tomcat server page using HTTPS.
The instructions on pages 13-16 are for using a self-signed certificate, which allows Tomcat to run on on HTTPS, but self-signed certificates are not trusted by web browsers so the canvas app will not display in Salesforce if you follow these steps. You will need to get a trusted SSL certificate and verify that the browser trusts pages rendered by Tomcat.
Fortunately Let’s Encrypt offers free, trusted SSL certificates and installing on Tomcat is relatively straight-forward. One caveat with Let’s Encrypt is that you can’t add a certificate to an AWS EC2 instance because they are ephemeral by nature. So you need to set up a domain or subdomain and point it to your EC2 instance. There are many domain registrars to choose from. For the purposes of this example, I set up a free domain using Freenom. These are instructions for pointing a domain to EC2 using Amazon’s domain service, but the steps are similar for other services. If you are using Freenom, navigate to your domain, click Manage DNS and make sure you create an “A” record with your AWS EC2 instances’ IPv4 Public IP address as the target.
Make sure you are able to navigate to http://<your-domain>.com:8080 and see the same Tomcat landing page like you saw after installing Tomcat.
Next import the trusted certificate using the commands below.
# Navigate to Tomcat directory indicated in Sparkler guide
$ sudo su
$ cd /usr/share/tomcat7

# Install certbot and make it executable
wget https://dl.eff.org/certbot-auto
chmod a+x certbot-auto

# Create the keystore with the private key
# IMPORTANT: when asked for your first and last name, use your full domain, for example www.<your-domain>.com
# Make sure this value is reflected correctly for the CN value in the confirmation step.
sudo $JAVA_HOME/bin/keytool -genkey -alias tomcat -keyalg RSA -keystore /usr/share/tomcat7/.keystore -keysize 2048

# Create the certificate signing request
sudo $JAVA_HOME/bin/keytool -certreq -alias tomcat -file request.csr -keystore /usr/share/tomcat7/.keystore

# Get a trusted certificate
sudo service tomcat7 stop
sudo ./certbot-auto certonly --csr request.csr

# Add the certificate to the keystore
# Choose option 1 for standalone
sudo $JAVA_HOME/bin/keytool -import -trustcacerts -alias tomcat -file 0001_chain.pem -keystore /usr/share/tomcat7/.keystore
After importing the trusted certificate, you can complete steps 2 through 6 on pages 14-15 of the Sparker guide, updating the server.xml file and restarting Tomcat.
Test Tomcat over HTTPS by navigating to https://<your-domain>.com:8443/ in your browser. You should see the Tomcat landing page and your browser should indicate that the page is secure without any warnings. You will use this base URL when creating the connected app in Salesforce.
Install Sparkler
Follow the instructions on page 16-17 of the Sparkler setup guide. To transfer the war file from my computer to the home directory of my EC2 instance, I used the PuTTY Secure Copy Client. Make sure that you are able to get to the Sparkler test page.
Troubleshooting note: I ran into permissions issues with copying the war file and in the end just moved it using the mv command and then updated the file ownership to make sure that the Tomcat user and group owned the file.
Step 4: Set up Secure Communication between Sparkler and Tableau Online
Configure Tomcat to Accept Self Signed SSL Certificate from Tableau Server
If you are using Tableau Server, chances are you have already enabled HTTPS and are using a commercial certificate authority. If that’s the case, or if you are using Tableau Online, you can skip this step. If you are using Tableau Server with a self-signed certificate you need to configure Tomcat to accept self-signed certificates using the steps on pages 18-19.
Set up Authentication between Sparkler and Tableau Server/Online
If you are using Tableau Server, you can use trusted tickets to enable authentication between Sparkler and Tableau Server. This is a nice illustration of how that works. In this scenario, Sparkler is the web server that handles communication with Tableau Server. To set up trusted authentication follow the steps on pages 19-20 of the Sparkler guide.
If you are using Tableau Online, trusted authentication is not available as of the time of writing this post. This is the idea in the Tableau ideas community if you want to vote up the feature. Tableau Online supports SAML for authentication and the instructions for this approach are found on page 46.
The Sparkler guide says that the user must be logged into the Salesforce org with SAML using the same identity provider as is used for logging into Tableau Online, but a lot of people don’t think of Salesforce as an identity provider and I was curious if we could configure the developer org we created in the prerequisites section of this post to be the identity provider to skip having to mess with a third party identity provider.
It turns out this approach worked! These are instructions for how you can set up SSO from Salesforce to Tableau Online.
Step 5: Configure Connection between Salesforce and Sparkler
Now we need to create a connected app in Salesforce and update configuration settings in the Sparkler app.
Set up Connected App in Salesforce
Follow the instructions for setting up the connected app on pages 21-23.
Configure Sparkler with Connected App Information
You need to transfer the sparker.xml file that was included in the sparkler zip file from Tableau to the server where Sparkler is installed. I used the same approach as with transferring the war file.
Troubleshooting tip: there is typo in the sparkler guide on page 23. The correct location to copy the xml file to is /etc/tomcat7/Catalina/localhost/sparkler.xml
If you are using SAML with Tableau Online, you must set the following parameters (see pages 24 and 46 of the Sparkler guide):
- consumerSecret: (from Salesforce connected app)
- useTrustedTickets = false
- host: (from your Tableau Online site)
- port = 443
- isSecure = true
- userIdentifierField (I used email)
- emailDomainsAllowed: comma separated list of email domains, e.g. @gmail.com, @yahoo.com
- siteRoot: /t/yoursite (NOTE: this differs from the Sparkler guide. I was getting a blank page before I found this solution.)
- statusPage = true
After saving the xml file and restarting Tomcat server, test the connection by opening the Canvas App Previewer in Salesforce setup. You should see your user information displayed on the page. That information is being passed to the Sparkler app and then displayed back into the Salesforce UI.
Step 6: Embed and Filter the Dashboard on a Record in Lightning Experience
Create a new Visualforce page by Navigating to Salesforce Setup, search for and open “Visualforce Pages”. Click the “New” button, enter “CanvasTableauEmbed” for the name and check the box “Available for Lightning Experience, Lightning Communities, and the mobile app”. Replace the placeholder code with the code below.
<apex:page standardController ="Account" showHeader="false" sidebar="false">
<apex:canvasApp applicationName="Sparkler_Connector"
    height="300px"
    width="100%"
    parameters="
    {
         'ts.name': 'SampleSalesforcePipelineDashboard/SamplePipelineDashboard',
         'ts.filter': 'ID (Account)={!Account.Id}',
    }" />
</apex:page>
Now we need to customize the Account record page to show the dashboard. Navigate to an Account record in your Salesforce org. Click the gear icon in the top right and select “Edit Page”. This will open the Account Record Page editor in the Lightning App Builder. Click the Tabs (1) component, then the Add Tab (2) button. Select “Custom” (3) for the Tab Label and enter “Tableau Canvas” for the Custom Tab Label (4).

Click the Tableau tab, then drag Visualforce component from the list of Lightning Components onto the page. In the right pane, select CanvasTableauEmbed for the Visualforce Page Name and leave the Height blank to use the default height set by the Visualforce page. Save the Account Record Page and then view an account record to see the filtered dashboard.
Summary
The primary benefits of this approach are that the integration at the presentation layer is handled with JavaScript instead of with an HTML iframe, allowing for more complex interactions between the embedded visualization and the Salesforce app. If you are using Tableau Server, you also get the option to handle authentication with trusted authentication as an alternative to SAML.
Advantages of this approach include:
- Single sign-on: SSO is required with this approached. The Sparkler adapter supports SSO using SAML (Tableau Online & Server) or trusted authentication (Tableau Server only).
- Multiple devices: Tableau Desktop provides a number of features for design responsive layouts when creating the dashboard. This needs to be specified in Tableau, rather than in the Salesforce application. Custom record page tabs can also be created for the mobile layout, and Visualforce pages can be embedded in mobile cards or in page layouts and viewed in the Salesforce mobile app.
- Look and feel: There are a lots of chart types and options for customizing the styling and layout of charts and dashboards. This seems to be one of the key differentiators for Tableau.
- Large data volumes: Tableau Server/Online can handle very large data volumes.
- Data sources: Tableau supports many connectors to various data sources and data formats. This appears to be a particular strength of Tableau.
- Data model: Tableau provides robust functionality for restructuring and enhancing the data model to support visualization needs.
There are some limitations with this approach
- Effort and skills required: Tableau Desktop is a robust tool and harder to learn than Salesforce reports and dashboards, but definitely very accessible. However, this approach does require knowledge of linux servers, SSO, HTTPS, certificates, web servers and more advanced Visualforce, as well as JavaScript. Keep in mind that the Sparkler app needs to be updated every 12 months or so as new versions are released.
- Accuracy of data: The flip side of being able to handle very large data volumes is that the data is not queried from the CRM in real-time. Data in Tableau visualizations are updated up to every hour so embedded visualizations may not be totally accurate, but hourly might be close enough for your requirements.
- Data security: Tableau typically aggregates data from source systems into a new data set within Tableau and any Salesforce data security settings, such as object and field level security and record-level sharing, are not transferred by default. If your data security model is pretty open, this might not be an issue. For other scenarios, especially embedding in external-facing application pages, re-creating the field and row-level security in Tableau could be a significant effort.
- Deployment process: Source data, worksheets and dashboards are created in Tableau Desktop, then pushed to Tableau Server/Online and live separate from the Salesforce platform. The process for creating/updating embedded assets needs to be coordinated with the process for creating/updating the application page in which they are embedded.
Next post: Embed Tableau Dashboards in Salesforce Records Using JavaScript API
Resources
- Amazon documentation: Working with the AWS Management Console
- Amazon documentation: Set up Amazon EC2
- Tableau: Salesforce Canvas Adapter
- Tableau server: How Trusted Authentication Works
- Salesforce documentation: Lightning App Builder
- Tableau Sparkler guide v1.04: SalesforceCanvasAdapterforTableau(Sparkler)_v1-04


